Follow me on my project as I purchase a Yamaha XS650, get it running and registered and then chop it into what hopefully is a sweet scoot that I can get out on and tear up the roads.

Wednesday, May 26, 2010

Cleaning the brakes

The other weekend I started on cleaning up the brakes, as they had been disconnected a while and looked like they needed a good clean.

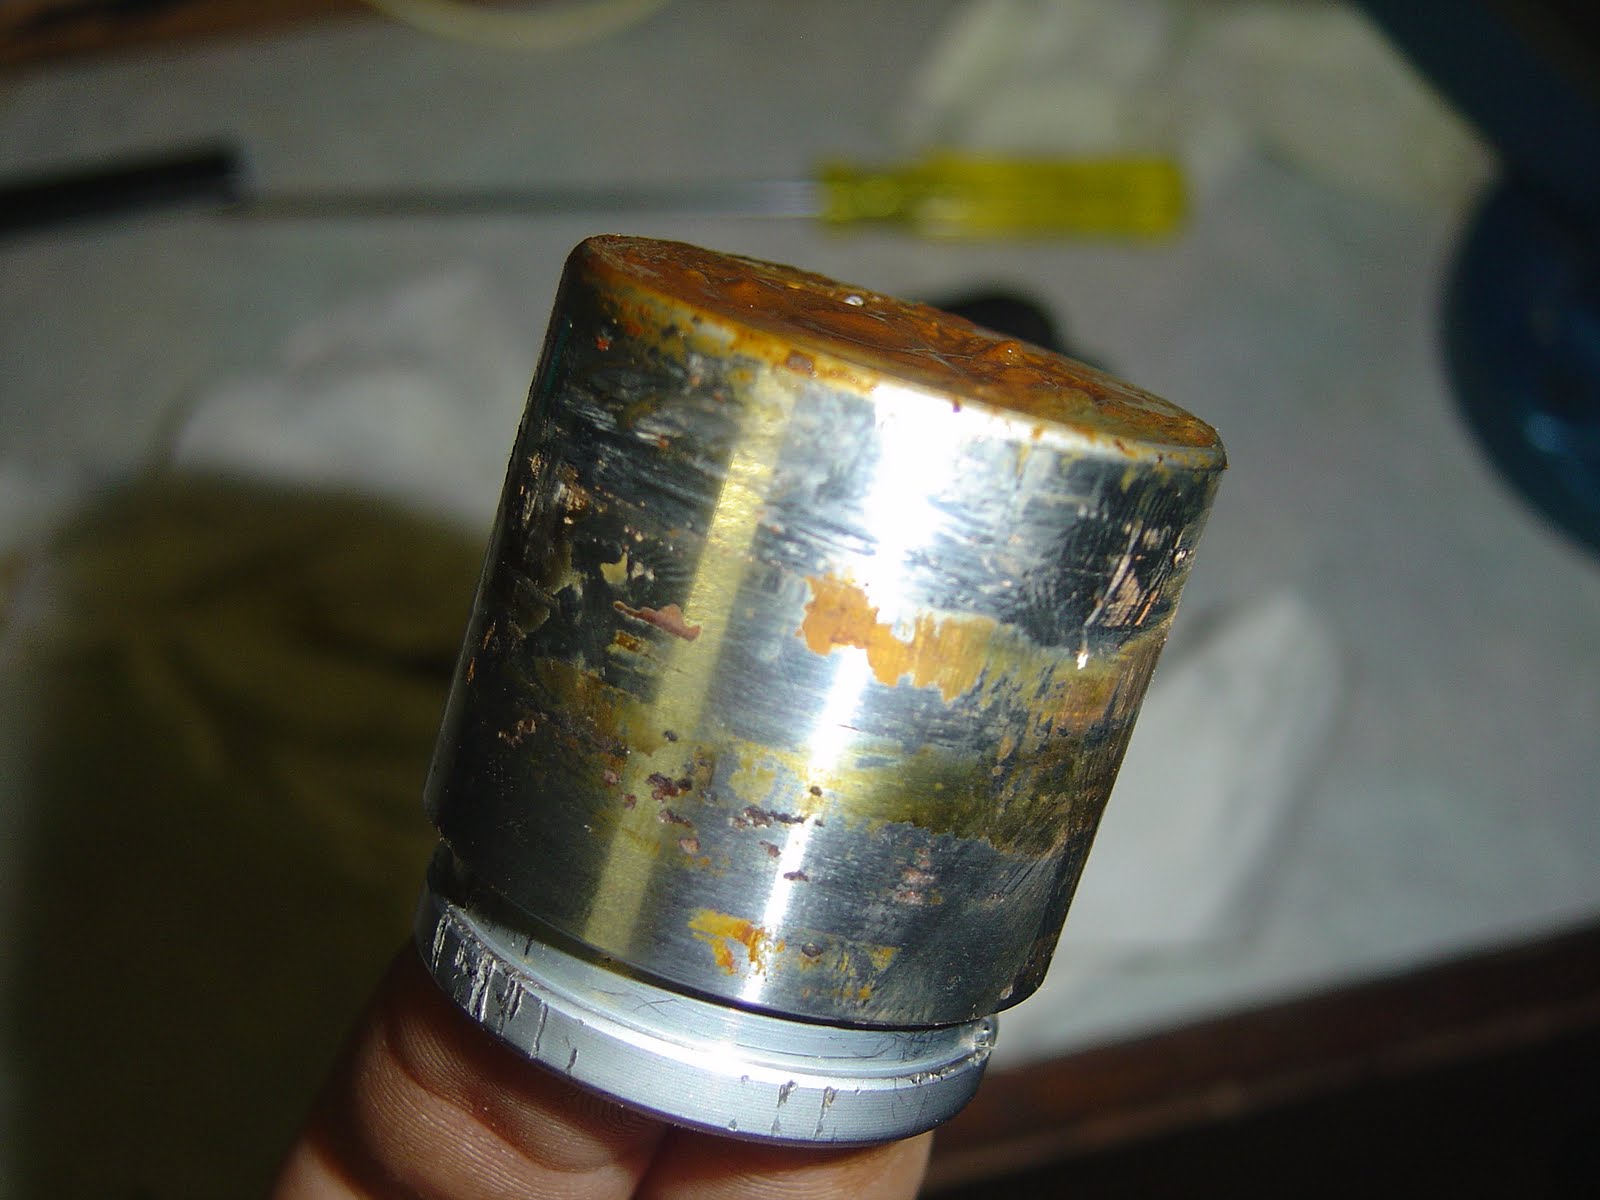
It turns out that I was right, as they where seized solid. It took a can of brake clean per caliper, a c clamp, a piece of timber and my air compressor to get the pistons free and out of the caliper housing.

I started by getting the calipers off the bike and giving them a good clean around the piston. With one caliper I was able to bottom it out and then slowly work it out with the compressed air, the other caliper took several hits of 110PSI of air with lots of brake cleaner to even move the smallest amount.

With lots of air and then pushing the piston back into the caliper I was able to eventually get the piston free.

The pistons have some pitting on them, and I am going to get someone elses opinion on them before installing the rebuild kits and reassembling as I am not sure if they should be used again or not.

A few pics of the calipers:


Monday, May 3, 2010

Starting her up

I trid to stqart the bike on the Anzac Day Long weekend, but ran into an issue with the original coil having broken plug wires, plus I looked further into the bike, and at some stage someone had installed points and condensers, so the bike wasn't in fact running the TCI system from what I can tell.

So I set about installing the Pamco Ignition kit that I purchased from MikesXS and got that and the new coil all wired in. Although the bike had been converted to run the older points system which uses the ATU unit, I had to replace it all as it was worn and siezed.

That set me back until this weekend when I completed the wiring and had a go starting the bike. I hooked everything up, put the battery in and filled it with fuel, only to have the left carb pour out fuel. It was obviously the float sticking, but tapping it with a screwdriver did not stop the flooding. So I pulled the carbs off again, re-set the float levels and made sure all was ok, and I ran a test on the bench to check if the carbs would flood again. This time there was no flooding, but there was a leak from the Fuel T piece that connects the two carbs to the fuel source. Not having actually split the carbs apart from each other, I had not replaced this piece or checked it out.

I started pulling the carbs apart, but got the the screws holding the carbs to the link bar, which where soft and starting to strip. With one screw nearly completely mangled already, I decided to use a trick I had done before - get some nuts welded onto the tops of the screws to help pull them out.

I got a good friend of mine to tig on some nuts and together with the welding and the two of us persuading the screws we got them dissasembled. I then stripped off the work rubber on the end of the carbs and cut up some new fuel tube and pressed the assembly back togethe. This stopped the fuel leak from the T piece, so I mounted the carbs again and got to kicking her over.

After finally getting the fuel flowing correctly, the battery was sitting at 7.4 Volts and I kicked the bike to life for the first time since I have had it, and for the first time in over a year for the bike itself.

I would recommend double clicking on the Youtube video below and opening in a new full size window

Sunday, April 18, 2010

Making progress

The last few weekends I have been working away at the bike getting ready to hopefully start the motor next weekend, which is a long weekend for Anzac Day. I have also placed a couple more orders from MikesXS for some more parts.

Parts wise, I have purchased:

Engine Oil Seal Kit
Clutch Pushrod Oil Seal
3 Bond #1194-Gasket Sealant
Headpipe Gaskets
Gasket - filter element cover
Gasket - filter element base
Gasket - RH crankcase cover (clutch)
Gasket - carb holder (Pk./2)
Gasket - LH case cover (Alternator)

That order with shipping came to a total of $123.88 AUD with shipping.

I have also placed an order for the following parts last week, and they will arrive this week:

Speedo-2.25" White Face 0-220 KPH
Pamco Electronic Ignition Kit
Copper Washers - (Pk/10) filter/Cooler
Tach Drive Block-off Cap

Which was a total of $342.10 AUD with shipping.

Last weekend I pulled off the right hand case cover and cleaned up the insides of that, replaced the kickstarter seal, re-installed the kickstarter, new oil filter, new gaskets on the oil filter, it's cover and the side cover.

This weekend I have replaced the clutch pushrod seal, checked over the carbs again and then installed them. All I have left to do before I can start it up, is fill it with oil, confirm the timing is still ok, hook up a temporary fuel tank and hope that the wiring is still all ok.

My total for the project so far is now $804 out of pocket, which I think it pretty good. Sure I could have saved a little cash by not purchasing the new speedo and pamco ignition, but I think they are justified by the fact that they will allow the bike to run better (Pamco ignition) and the new speedo is smaller and has all of the lights needed for the bike to stay legal with our road rules. My current speedo looks ok, but the original tacho is broken and non functional, so it is going to come off as I could fail roadworthy if it is on the bike and non functional, and it contains the high beam light (which is also a must for roadworthy)

So hopefully my update next weekend will be a good one with a running motor and a video to show it!


Monday, April 5, 2010

Easter Long Weekend

When you need a bit of time off so that you can work on some projects, the only thing better than a three day weekend is a four day weekend. Easter is one of those.

Over the four days I have managed to get in a solid 14 hours work on the bike. I continued on with the cleaning of the motor (inside the sump and the outside of the motor)and getting the sump back together, and all that I am waiting on is delivery of my gaskets and seals so that I can install the side mount oil filter, new clutch pushrod seal (notorious for leaking, and the motor was covered in oil in that location before I degreased it) and then refill with oil.

I also used some scotch-bright and nylon abrasive pads on the motor with a little autosol to start cleaning up the fins on the motor. All of the places that I can reach with the pads are now clean and shiny. There are a few places that I cannot reach properly with the drill mounted pads so I am still considering borrowing/hiring an air compressor to blast with bi-carb soda, but at the moment the engine is clean enough that it will pass any inspections and checks for rego when the time comes. I think that I will hold off on too much more cleaning of the motor until I pull it out of the frame a little later on.

The other week I caught up with my best mate Nathan and borrowed his tripod so that I could film and capture some better images of the build progress on the bike, plus I will be able to fully capture the first kick of the bike in a few weeks. I have been filming most of the work I have done from when I rebuilt the carbs through to the work done on the weekend. I am working on a few clips at the moment, but they will be a little while off.

Below are some pics of the engine before and after the cleaning with the abrasive pads.


Tuesday, March 30, 2010

More work on the bike

A little more progress was made on the weekend. I pulled the sump off and drained all of the old oil out. The bottom of the motor was so dirty and covered in old oil and road grime that both of the drain plugs are seized in place with dirt.

The only way I was able to get the old oil out was to use 2 cans of degreaser and a wire brush to clean up as much of the dirt from the 6 sump bolts and drop that instead.

Once I got the sump plate off, I used another 3 cans of degreaser trying to get more of the dirt off of the outside of the sump plate (including soaking it for 3 hours in the degreaser and then scrubbing). I can now see that the sump is in fact made of aluminium, but I still have a long way to go to get it very clean.

I may need to look into borrowing a friends air compressor and making my own temporary soda blaster to strip the sump plate and the bottom of the motor. I would also then soda blast the fins on the motor to clean them up a little. I know that soda blasting isn't overly abrasive, so it wont remove all of the pitting itself, but if I can get it very clean with the soda blasting I will then finish off the motor by hand with some sanding and metal polish to get it back to it's former glory.

Over this coming long weekend I am going to pull off the right side cover of the motor, check out the clutch, give it a good clean under the cover and then I will be ready to start putting the motor back together with new gaskets for the side covers, the new oil filter and sump filter and some new oil. Then I will need to check the timing and I will be able to kick it over and get it started.

Before getting it back together though, I need to order two gaskets that I missed ordering last time. I will also order a new clutch pushrod seal, as it is a none seal that will leak as soon as you start a motor, so I will go ahead and replace that before starting.

Monday, March 22, 2010

Working on the Bike.

Now that my parts order has come in, I have started work on the bike again to get it going.
This weekend I have put the carbs back together with the rebuild kits plus new main pilot jets as one of my old ones was blocked and would not completely clean up.


Sunday, March 7, 2010

Parts order and my costs so far

This afternoon I placed my first order for parts that I know I will need for the bike to run/pass rego. Below is my list of parts that I have ordered:

Sump filter
Sump gasket
Oil Filter screen
Carb Rebuld kit
Main Jet washer
pilot jet rubber plug
pilot jets
float bowl screws
Top cover screws
Carb holder set
Carb clamp
stainless holder screws
Blind plug
Pod filters
inline square fuel filter
cable luber
gas cap rubber seal
brake rebuilt kit
bleed screws
caliper sleeve boot
Rotor puller
Timing light


This came to a total of $281 USD plus $46.43 shipping. My Total came to a total of $361.50 AUD for the parts.

I know that I will later be ordering a Pamco Ignition ($199 with everything I need) plus at least a few copper gaskets and probably a few bearings, so I am not done yet.

My current project costs sit at me being $195 out of pocket. I think I am doing alright so far.

Wednesday, March 3, 2010

Some more parts

Today the adaptor bracket to create the permanent magneto setup arrived. This bracket is cast by hand by a guy from the US who was one of the first to look into using the Yamaha Banshee Rotor on an XS. It is a great little adaptor and it is a shame that it is going to get covered and hidden away, but it will make the bike a better chopper. This also means that I am only waiting on the Honda Stator to arrive and I have all the magneto parts.

I also dug through my boxes of car and bike parts and found my Regulator/Rectifier that I purchased a couple of years back when the CBR had charging issues. The stock Reg/Rec turned out to be ok (my multimeter at the time was stuffed) and I actually had to replace the stator due to some fried windings, but this is a suitable reg/rec for the magneto setup, so it has worked out well.

I have also created a list of the parts that I need to order, so far it has all the carb parts that I need, and once I check out a bit more of the bike this weekend I will know the other parts that I will initially need. No doubt I will end up making another order for parts later on, but the parts now will get the bike running correctly.


Tuesday, March 2, 2010

A few parts I have collected

I thought that I would post up a few parts that I have collected ready for this project so far.

First up are the Risers that I got at the Toowoomba Swap Meet. I am very happy with these. A little bit of metal polish and a soft cloth and they will clean up very nicely.

Secondly is the Solo Seat Pan that I purchased of Dan at Slice N Dice. I went and picked this up off him yesterday and had a chat about bikes and my project.

Finally is the Yamaha Banshee Rotor that arrived today. This is the first part of my Permanent Magnet Alternator. I won't be using the stator that is bundled with this as I have the correct Honda VFR500 stator coming along with a generic Reg/Rec which makes up the system that will allow me to go batteryless.

I also managed to get the stuck jet out today, so they are all soaking and getting a good clean so I can see if they will be ok or if they need to be replaced.


Sunday, February 28, 2010

Tearing down the carbs continued

Today I continued on with cleaning the carbs both internally and externally. They are looking 100 times better now that they have had a really good scrub all over with carb cleaner and a toothbrush.

I have used a can of carb cleaner per carb so far, and I will probably use a half of another to go over the butterfly valves and inlet again while I place the order for the carb rebuild kits and some new screws for the bowls and tops as most of the screw heads are torn up.

I have only run into one little problem so far, and that is that the second carb's Needle Jet has not been able to be tapped out. All of the manuals and tutorials that I have seen on these carbs use a little piece of timber or dowel to tap out the brass needle jet. The first one tapped out with a toothpick and the handle of a screw driver, but so far nothing has allowed me to get out the other needle.

I tried soaking the needle jet every few minutes for a couple of hours and then trying again but it hasn't even moved the smallest amount.

I have asked a few people I know that have worked on these carbs a bit and I am waiting to hear back from them.

Until the next update on the carbs, here are some pics of them looking much cleaner.


Saturday, February 27, 2010

Degreasing the engine

As planned, earlier today I degreased the engine to see how clean I could get it and to make it a little easier to work on.

Before degreasing it all, I grabbed a roll of cheap garbage bags and a roll of duct tape and went to town covering everything that was electrical or had electrical wiring running along or through it.

Once wrapped up, I wheeled the bike aroudn the side of our house and got to degreasing it. Don't worry, that drain is just a square pit that doesn't go anywhere at all, so no I did not wash degreaser and sludge into the sewer system) I used all four cans of degreaser as well as a couple of brushes and toothbrushes to free up as much dirt, oil and grease as possible.

The outside of the engine didn't clean up all that much from what it was before, as the aluminium is actually pitted which makes it look dirty. It is however not oily or greasy to the touch which is a good change.

Where you really notice the work is under the side cover besides the gearbox where the front sprocket is. There was a thick black sludge under there before I started (Forgot to get pictures of it) and I think it was up to a centimetre thick in some places.

It is now almost spotless with just a few minor patches that I will try and clean up again at a later date.

I also pulled the spark plugs out and turned the motor over by hand for about 30 revolutions. It turned over really easily with a big breaker bar on the 17mm nut, so the engine is fine and obviously not seized. I will do a compression test at a later date, but I think it should be fine to run for a while without having to do any major work on it.

In the next couple of weeks I will start ordering some parts from . So far I will be getting carb rebuild kits (which consist of new float bowl gaskets and float valves) electric ignition kit (although I will try starting the bike initially with the current ignition system before selling it on) sump and oil filters, plus a few gaskets small little bits and pieces as I find them while going over the bike.

My goal is to start the bike by Anzac day (25th of April) which should be quite achievable.

Here are some photos from today:


Wednesday, February 24, 2010

Starting to tear down the carbs

This morning I started to tear down the carbs. It isn't an overly complicated process to tear them down and clean them but it is one that you want to be careful of so that you don't have to replace any more parts than needed.

The outside of the carbs is still filthy - I am told by the guy that I bought it off that he spent several hours cleaning the outside of the carbs just to get them looking this good!

So far the gaskets are still pretty good, and the diaphragm from the first carb is in good condition with no holes or tears that I can see so far.

I still have a way to go tearing these down and then I need to actually clean them, but I think I should be able to get the bike running pretty well with these stock carbs after a clean up.

I also purchased some degreaser and silicon lube this morning ready to start degreasing the engine which I want to try and start on this weekend. Hopefully these four cans plus the other degreaser that I have should be enough. These and and a good old scrubbing should get some of the grease and grime off the motor.


Tuesday, February 23, 2010

Project funds

One of my goals with this project besides making a cool as hell scoot is to try and do it on a reasonable budget. I sold the CBR for $2300 a couple of weeks back now, and I purchased the XS650 for $1500 with all the parts plus a few spares.

I am hoping that I can get the bike cleaned up, running, registered and then hardtailed for a total of $5000 which will mean that it is only a maximum of $2700 out of my own pocket, which I have already actually saved.

So I am going to be keeping a running total for costs to my project. So far I have sold the CBR, purchased the XS650, set of dogbone style risers, a manual, tool chest, rotor from a Yamaha Banshee, Magneto Adaptor plate.


Although I am still ahead +275 dollars, I am currently bidding on a Stator from a Honda VF500 which once purchased gives me all of the parts for my magneto system, which will allow me to run battery-less (although I will run a battery for rego and roadworthy) which is the aim along with going kickstart only.

I will then still need to purchase an Electric ignition pack ($200US to get the ignition, another coil, the mechanical advance parts, spark leads and caps) plus new oil filters, a couple of gaskets for the motor plus parts to overhaul the carbs along with anything else that needs replacing.

I am putting the large outlay down now and over the next coming weeks for the magneto system and the electric ignition, as I would much rather get the bike running with all of the most reliable parts I can get rather than stuff around the notoriously weak/flaky charging system and relying on the current Ignition system.

I will be able to sell the current ignition system (pending that it still works now) and possibly even the charging system to re-coup some costs towards the project.

Sunday, February 21, 2010

Weekend work

When I got the bike home the other day I looked at the garage and worked out how I was going to try and get the bike in, let alone work on it. So on Saturday I decided it was time to clean up the garage, cut down on the amount of junk that was hanging around and make some room to work on the bike.

So after a few hours of cleaning things up, tossing things out of the garage I had started to make some progress, but I was having issues on where to place all of my tools, as they had been spread out between my bedroom and the garage and where sitting wherever I could fit them, which would not suit trying to work on and rebuild a bike to a running condition.

So I headed off to man heaven - Bunnings and I purchased a tool chest and box combo. I am happy with the purchase. It is just the right size for all of the tools I have now with room for more to come, so I shouldn't need to upgrade too soon, and if I do need to, I can purchase additional boxes that stack on like the top toolbox with anywhere from 3-9 more draws.

So I got it home placed all the tools into that, and continued on cleaning.
By the end of the day I have managed to have the garage cleaner than it has been since before we moved in!

With the weight bench where it is now, I can still move the bike over enought that I can get to both sides of the motor to do any work. If I need more room I just push the bench and weights up the back of the garage and I can lay on the floor and do what I need.


Friday, February 19, 2010

The bike is home

So Thursday morning nice and early I helped load up the bike and all of it's bits and pieces and bring it home. Here is how it sits at the moment (minus tank and seat) and the there are the pics with the tank and seat on to show you how it will pretty much look once I finish getting it running and registered, which I am aiming to have completed by June 30. Hopefully I get it done in that time or less.

The bike is in a few pieces, things like the carbs, tank, brakes etc all need to be cleaned up, gone over and then installed once the bike and motor get a good clean and service.

I also got a few choices for handlebars which is cool. I am thinking either the pullbacks or the drag bars with the set of risers that I got from Toowoomba Swap Meet will look great.